Watermarker
Last updated: December 10th. 2022
Description
Semi-automated video transcoding, watermarking and timecode generation tool.
Problem
I created this application for a media company. They wanted an easy automated workflow for their incoming video material.
Requirements for this application were:
- Transcodes should be manually scheduled by the user without them being able to access the data itself.
- Video should be "probed" for presence of timecode, framerate, width and height.
- If no timecode is present, one should be added.
- Should output a low-res video for the translator including a company watermark and also the name of the translator.
- Should output a high-res video for use in recording studios with a company watermark.
Approach
After following an online Ruby on Rails and React.js course, I though this project could be a perfect fit for combining the two. I decided to separately build a front-end and back-end and do the communication between the two with JSON trough a REST API. This way, not only the appearance of the application could be changed at all times, but it could also be accessed from anywhere, while the back-end, doing the heavy lifting, could be managed centrally on dedicated hardware.
Front-end
Instead of using CSS in a traditional way, I used React's styled-components for the front-end. In the snippet below I was experimenting with both styled-components and regular stylesheets.
import React, { Component } from 'react';
import styled from 'styled-components';
import { Draggable } from 'react-beautiful-dnd';

import './styles/Transcode.css'

const Container = styled.div`
  border: 1px solid lightgrey;
  border-radius: 2px;
  padding: .5em;
  margin-bottom 8px;
  background-color: #0077ff;
  display: flex;
  align-items: center;
`;

class Transcode extends Component {
  constructor(props) {
    super(props);
    this.deleteButton = this.deleteButton.bind(this);
  }

  deleteButton() {
    this.props.deleteTranscode(this.props.transcode.id);
  }

  render() {
    return (
      <Draggable draggableId={this.props.transcode.id} index={this.props.index}>
        {(provided) => (
          <Container
            {...provided.draggableProps}
            {...provided.dragHandleProps}
            ref={provided.innerRef}
          >
          <span className="name">
            {this.props.transcode.attributes['translator-name']}
          </span>
          <span className="delete-button" onClick={this.deleteButton}>delete</span>
          </Container>
        )}
      </Draggable>
    );
  }
}

export default Transcode;
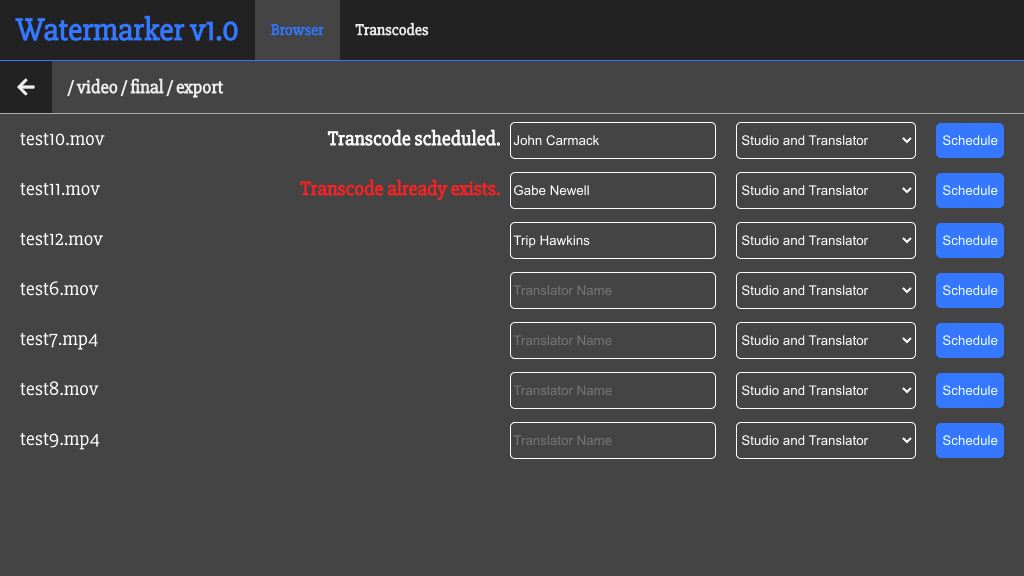
The front-end had two pages. Browser and Transcodes. A user could browse trough a file-tree view of a folder that the back-end was connected to (this made sure the user could not access the actual data). If a video had been selected, the user could input a name and select which video's had to be created and then schedule the transcode. After this, the transcode progress could be monitored on the Transcodes page.
Back-end
The backbone of the back-end was ffmpeg. ffmpeg is one of the most versatile open-source tools for working with video, images and audio. It's the command-line interface to libavcodec, which is used by software like VLC media player.
After a video is scheduled, a service worker performs a couple of tasks.
Probing
First, the video is probed using the ffprobe command (a subcommand of the ffmpeg suite). This probing detects framerate and whether the video has a timecode (both visually and embedded in the stream).
Rendering
Next, an image is generated from the text the user supplied in the name field. This is also done with ffmpeg.
A grid of logo's could also be generated to overlay on the videos.
Transcoding
Finally, the transcode(s) are scheduled. One high quality output containing the overlaid logo grid and optional timecode, and another medium quality one containing the same in addition to the overlaid translator's name.
Here's a code-snippet of the visual timecode detection mechanism of the probe class:
def detect_burnt_in_tc
  (0..8).each do |mode|

    detect_frame_offset(0) if mode == 3
    detect_frame_offset(@transcode.properties[:framecount]/2) if mode == 6

    # Print some information about the detection
    case mode
    when 0, 3, 6
      puts "OCR mode #{mode}: frames #{@frame_offset} and #{@frame_offset+1}, Using high contrast filter with blur"
    when 1, 4, 7
      puts "OCR mode #{mode}: frames #{@frame_offset} and #{@frame_offset+1}, Using filter for colored timecode with blur"
    when 2, 5, 8
      puts "OCR mode #{mode}: frames #{@frame_offset} and #{@frame_offset+1}, Using normal filter with blur"
    end

    # Export frame for detection and get raw ocr data, replace whitespace with underscores and return array of matches, repeat twice
    %x(#{@cmd.ffmpeg_make_png(@frame_offset, mode)})
    matches1 = %x(#{@cmd.tesseract}).gsub(/\s+/, "_").scan(/\d\d\:\d\d\:\d\d.\d\d\D/)
    %x(#{@cmd.ffmpeg_make_png(@frame_offset+1, mode)})
    matches2 = %x(#{@cmd.tesseract}).gsub(/\s+/, "_").scan(/\d\d\:\d\d\:\d\d.\d\d\D/)

    # If only one timecode per frame was found
    if matches1.size == 1 && matches2.size == 1
      # Grab frame numbers and cast them to integers
      frame1 = matches1[0][9..10].to_i
      frame2 = matches2[0][9..10].to_i

      # If we're dealing with actual frame numbers
      if frame2 > frame1 || frame2 == 0 && frame1 == @transcode.properties[:framerate].floor
        # Store detected timecode
        tc_at_offset = "#{matches1[0][0..1]}:#{matches1[0][3..4]}:#{matches1[0][6..7]}:#{matches1[0][9..10]}"

        # Calculate original start timecode based on detected timecode and frame offset
        @transcode.properties[:tc_start_ocr] = tc_subtract_frames(tc_at_offset, @frame_offset, @transcode.properties[:framerate])
        break
      end
    end
  end
end
